I kid, I kid. Anywho, I finally completed my Lego shoes project!!! And finally got around to photographing them! So now I'm gonna share 'em with you all! The following is a step by step guide to constructing your very own pair of Lego pumps. Or sneakers... Or any kind of shoe really. But I did pumps, because they're purtttyyy. :D Enjoy!
Step 1: First, you're obviously going to need a pair of shoes. Since you're kind of going to be covering their every surface with Lego stuff, I recommend getting a cheap pair that aren't too gorgeous on their own ORRR some old shoes that you don't like anymore. For cheap shoes, you will definitely be most successful shopping around at used clothing or thrift stores. Wherever you are (if you're in the US, sorry I don't know about other countries...), there's probably a Goodwill or a Ross near you, but if you can, you might wanna check out this really, really awesome new and used clothing chain called Buffalo Exchange. It. Is. Fantastic.
Check it out and see if there's one near you: http://www.buffaloexchange.com/index.php?pg=4
I know that there are some in Seattle, WA; Portland, OR; Chicago, IL; New York City, NY; San Francisco, CA....
Anyways, I got my shoes at my local Buffalo Exchange:
These were $12 at BE and actually pretty cute.
If you're going to do heels, it's best to pick a pair with slim heels like these. The bricks are thick and after adding them, the heel will be significantly thicker so if you start with a thin heel you'll finish with a normally sized heel.
Pretttyyyy :)
This shoe is by a line called "Restricted" which I'd actually never heard of before. But this purchase made me check it out and I discovered it's actually a pretty cool line. You can check it out here: http://www.restrictedshoes.com/
Step 2: Though the shoes are very important, you're gonna need a couple other things...
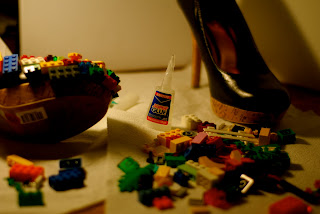
Some super glue! I used Krazy, Gorilla and Loctite Super Glue. And then you're definitely gonna need something to lay down to keep from making a huge, PERMANENT mess. Cause I'm telling you, that stuff is STICKY. And it dries reaaaalllyyy fast. I guarantee it will ruin your tabletop if you don't lay down a crazy amount of newspaper or paper towels or even a couple old rags. And when you skip my advice and are sitting, staring at your destroyed tabletop with dead and empty eyes, just remember: I TOLD YOU SO. You also HAVE to get several pairs of plastic gloves, and this, you really cannot skip. Super glue is great and really effective, but can also be very dangerous if you don't handle it carefully. It's some seriously strong stuff! IT WILL GLUE YOUR FINGERS TOGETHER PEOPLE. Or it will glue your fingers to your Lego blocks. Or your face. Or the table. Or up your nose. And how embarrassing would that be? That's one trip to the emergency room you do NOT want to take... So just wear gloves and be careful!
If you're not comfortable with using super glue, that's okay. You can also use a hot glue gun! Personally, I think that super glue works better and is easier to use, but both work.
If you're still not cool with the glue choices, then I'm not sure if this is the right project for you... *cough* LOSER *cough* Nahhh I'm totally kidding! There's no shame in being afraid of super glue OR scary guns that fire scalding strings of stickiness. But in all seriousness, you're probably a creative person! I'm sure you can think of a good alternate method of applying your blocks. In fact, if you do, let me know!
Moving on, as you can see in the picture, I also used a creepy mask thingy that my dad bought during the whole H1N1 freak out. I find that certain super glues can have this really strong and toxic smell that can make your eyes and throat burn when you get too close, so if you want to avoid that, a mask is a nice solution. But, if you don't want to look like someone out of Contagion, all you have to do is use a less violent super glue. From my experience, Gorilla and Krazy Glue both have a really strong smell, but Loctite is pretty much odorless.
Step 3: Now for the Lego blocks!!! You want a wide assortment of colors, shapes and sizes! If you don't already have a million Legos at your house (aka, if you don't have a little brother) there are some really great stores with bins and bins of Legos out there, you just gotta find them! My city has a couple actually and yours will most likely have a few too! You just need to look for them.
Also: don't be afraid of using more than the classic Lego blocks. Feel free to use mini figures, flowers, animals, etc... to spruce up your shoes! But make sure to put the special pieces on last because you don't want to end up covering them up with normal, boring blocks later...
Step 4: When you have all your supplies and everything is all set up, you can begin to apply the Lego blocks! When you're doing this, you want to approach it sort of like a puzzle or a mosaic of Lego-rrific splendor. Make sure there are no big patches on your shoe where it's original surface is visible, and if there are spaces that are smaller and hard to fill, use the teeny tiny one piece blocks. If you know Legos, you'll know what I'm talking about. Gahhh it's hard to explain this all like over zee interwebz.... Never mind, it's a pretty instinctive thing. You'll know what to do when you get there.
If you're not quite sure whether you're gonna piece everything together perfectly on the first try, you might want to use tape to place your pieces at first. That way you can get a patch of your shoe planned out, glue it down permanently, and then move on to the next. (That's what I did in this photo.)
Remember, if you do make a mistake and place something incorrectly using the super glue, it's okay to yank it off if it's just going to damage the surface of the shoe. You can cover it back up with the proper pieces later! Wow... that was sort of unrelated to this picture.
Now here are some pictures of my final product! While I was taking these pictures, there were a whole bunch of fabulous patches of light being cast by the setting sun, so I decided to make "sun patches" a sort of theme in my photos. I also got my poor brother to help me (those are his hands). Let's all give him a round of applause. Now enjoy!
I'll admit these last two don't really have anything to do with sun patches... Maybe pumpkin patches? Yeah, we'll go with that.
So in conclusion, this project was kind of awesome. If you like puzzles and mosaics and those kind of things, it's definitely a great art project for you too! It doesn't take too long either, and it's not all that expensive. AND since it's December (!!!!), it could make the perfect artsy, creative Christmas present! :D And it doesn't have to be Legos either people, although Legos are very, very cool. You can do it with.... I don't know... Polly Pockets, buttons, beads, pearls, other tiny toys, etc... There is a world of possibilities out there so go forth and create my minions! Go forth and fill the world with fabulous shoes!


HOLY SHITAKI MUSHROOM. THOSE SHOES ARE THE BOMB DIGGITY IN EVERY POSSIBLE WAY. THEY ARE BEAUTIFIC. I AM IN LOVE. GOOD JOB ON BEING THE MOST AMAZINGLY CREATIVE PERSON EVER. <3
ReplyDelete